Overview
Loading and Saving Kits
The Pad Grid
FILE
SAMPLE
PAD
FX BUS
OUT
Slate is an instrument with 32 playable pads in place of a conventional piano-style keyboard. You can assign samples to each pad which are triggered when the pad is tapped or held. It's best suited to drums and percussion, but you can use it to play any type of sample.
| |
Quick links: Overview Loading and Saving Kits The Pad Grid FILE SAMPLE PAD FX BUS OUT |
Each Slate pad can be thought of a simple sample-based synthesizer. You may assign up to three samples to each pad and determine how they are played using layering, velocity splits and crossfading.
When a pad is triggered, it uses velocity to determine which samples it should play and the volume levels they should be played at. The pad then mixes the samples together and passes them through its filter, waveshaper and amplitude envelope. Each pad also has a pitch envelope which is applied to its samples as a whole.
Slate also has two global send effects in the form of a reverb and a delay unit.
There are four internal FX buses. Each of these has an effects chain consisting of an EQ, a compressor, a general purpose filter and level controls for the reverb and delay sends.
Finally, there is the main output bus, which also has an effects chain consisting of an EQ, a compressor, a limiter and level controls for the reverb and delay returns. The outputs of the internal FX buses are fed into the main bus.
By default all pads send their output straight to the main output bus, but you can choose to route any pad to an FX bus for extra signal processing.
Slate stores its complete setup in the form of a Kit. Kits can be loaded, saved, imported, exported and copied and pasted between other Slate instruments (including those in other projects).
Kits are held in three different locations:
| USER | User kits are kits you've saved. If you wish, you may save a special user kit named Default which the Slate will automatically load when it is created. |
|
| FACTORY | Factory kits come as part of the app. They are read-only, but you're free to edit them and save them as user kits. |
|
| IAP | IAP kits come with some types of in-app purchase. They are read-only, but you're free to edit them and save them as user kits. |
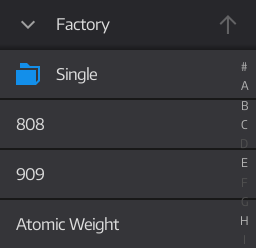
The factory kits and samples supplied with Slate are organized in a specific manner. Inside the Factory folder, there is a subfolder named Single. This folder contains kits which hold just a single percussion type (eg. kicks, snares or cymbals etc.). Most of Slate's factory samples are held within the single kits, which help to keep each percussion type grouped in its own location and makes life easier when you're looking for a particular type of sound.
In most cases, the main factory kits don't contain their own samples. Instead, they use the samples located in the single kits. You can think of the single kits (and the samples they contain) as an organized palette of percussion types to draw upon when building your own kits using factory samples.
Many of the factory samples supplied with Slate use a special NanoStudio file format which is capable of storing multisampled percussion with velocity layers and random/round-robin hits. They are mainly used for acoustic drums where more natural variation is desirable and can be recognized by their .mwav file extension. The .mwav file format is read only and cannot be edited via the Sample Editor. However, if you like one of them and would like to use them without any variation, one possibility would be to resample them using the Mixdown function and then load the resulting sample onto a Slate pad.
To load a kit, use the Edit Panel's FILE page. You can also use this page to copy, move, rename, import and export kits.
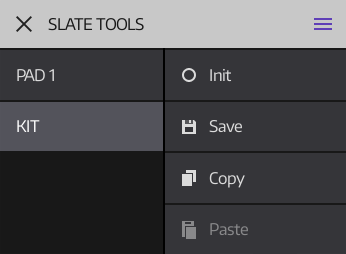 |
To save a kit, tap the HAMBURGER BUTTON in the top right corner of Slate's title bar and select the KIT category from the dropdown menu. This menu also gives you options to initialize the current kit and copy or paste kits. You can also copy a kit from your current project, load a different project and then paste into that. |
Slate can load and convert legacy kits from NanoStudio 1's TRG-16 instrument. Import your TRG-16 kits into Slate's User folder and then load them like any normal Slate kit. Slate is a different instrument to the TRG-16, so the conversion is fairly basic but the main kit samples and parameters will be preserved.
The pad grid is used for performance. Use the title bar to choose a view appropriate to your requirements.
VELOCITY |
Determines the velocity value used when tapping on a pad: 64 / 100 / 127 - Use a fixed velocity value. TOUCH - The velocity is determined by the vertical position of your tap. |
|
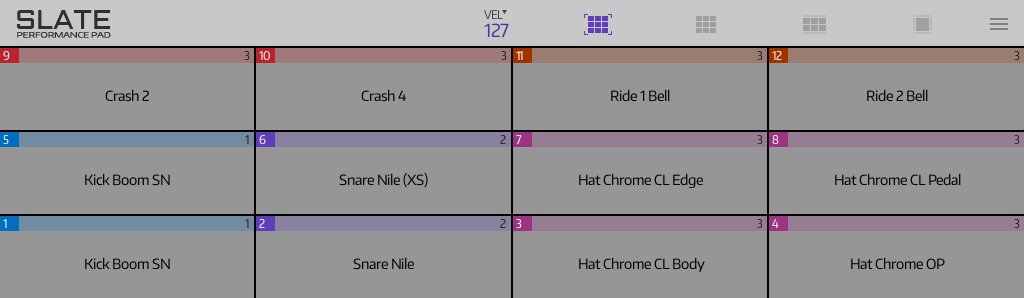
FULL VIEW |
Expands the pad grid to fill the entire screen, hiding the editing panel. | |
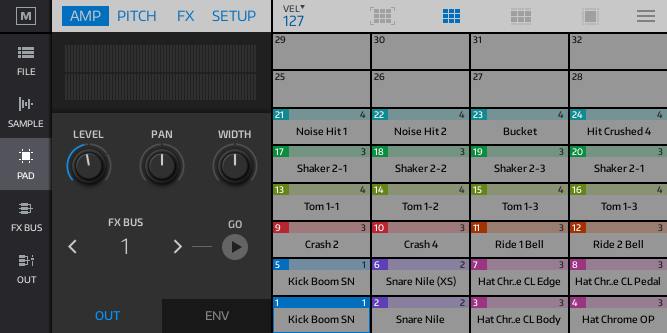
32 PAD VIEW |
Shows all 32 pads, including the editing panel. | |
16 PAD VIEW |
Shows 16 larger pads and 16 minimized pads. TAP on any of the minimized pads to expand them. | |
SINGLE PAD VIEW |
Dedicates the entire area to a single pad. The vertical position of your tap determines the velocity. | |
HAMBURGER BUTTON |
Invokes a dropdown which allows you to perform actions on the selected pad or the whole kit, such as saving, loading, copying and pasting. |
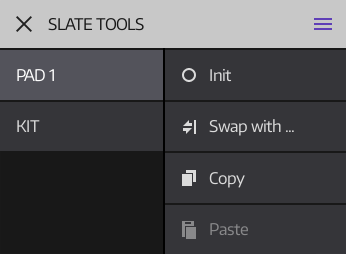 |
Tap the HAMBURGER BUTTON in the top right corner of Slate's title bar to invoke the tools menu. This menu gives you options to initialize, copy and paste the selected pad or swap it with a different one. Pads can be copied and pasted between Slate instruments in the current project, or you can load a different project and then paste into that. |
The edit panel is used to change settings for both the selected pad and the instrument as a whole. It is also used for browsing kits and samples.
It is divided into a number of pages which are selected using the tab buttons on the left.
Most pages also have subpages which are selected using the title bar at the top.
  |
MUTE BUTTON When enabled, this allows pads to be muted or unmuted by tapping or dragging on them. FILE PAGE Use the file page for browsing and loading kits or samples. SAMPLE PAGE For setting up samples and velocity splits for the selected pad. PAD PAGE Synthesis parameters, groups and visual customization for the selected pad. FX PAGE The 4 internal FX buses. OUT PAGE Main output bus and global send effects. |
The FILE > KITS subpage is for browsing, loading, copying, moving, renaming, importing and exporting kits.
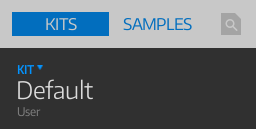 |
TAP on the kit's name to invoke the full screen File Browser. |
 |
QUICK BROWSER A simpler alternative to the full screen File Browser when you just need to browse or load kits. |
The FILE > SAMPLES subpage is for browsing, auditioning and loading sample files.
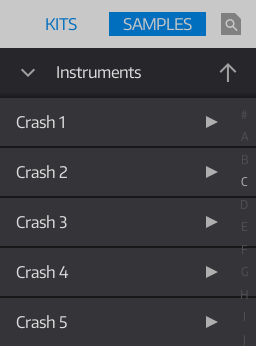 |
Tap on the title bar's LOCATE BUTTON to quickly find the sample for the selected pad. TAP on an item's play button to audition the sample without loading it. DOUBLE TAP on an item to load a sample to the selected pad. This action always replaces Sample 1 of the selected pad. TAP AND HOLD on an item and then DRAG AND DROP on the grid to load a sample to any pad. If the pad has enough screen area then you have the option of dropping the file to Sample 1, 2 or 3. Otherwise, the dropped file always replaces Sample 1. You can also remove, load, edit or record samples for the selected pad using the SAMPLE Page. |
The SAMPLE > 1-3 subpages are for setting up the selected pad's samples.
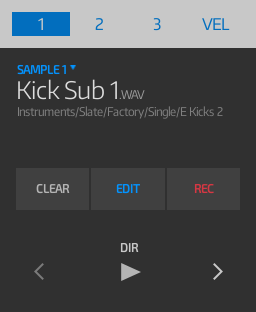 |
Use the title bar to choose the sample you wish to edit. TAP on the sample's name to invoke the full screen File Browser CLEAR - Unloads the current sample. EDIT - Opens the current sample in the Sample Editor. REC - Opens the Sample Editor for recording a new sample. DIR - Sets the sample's play direction. |
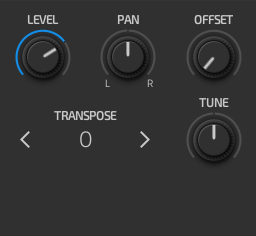 |
LEVEL - Sets the sample's output volume. PAN - Sets the sample's stereo position. OFFSET - Applies an offset to the sample's start position. TRANSPOSE - Sets the sample's pitch in semitone steps. TUNE - Sets the sample's pitch in cents. |
The SAMPLE > VEL subpage is for setting up how the selected pad's samples respond to note velocity.
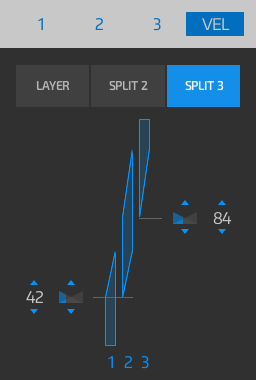 |
There are three velocity layer and split modes available: LAYER - All 3 samples are layered on top of each other. SPLIT 2 - Samples 1 and 2 are velocity split, and sample 3 plays all the time. SPLIT 3 - All 3 samples are velocity split. DRAG VERTICALLY on the controls to set split points and crossfade regions. |
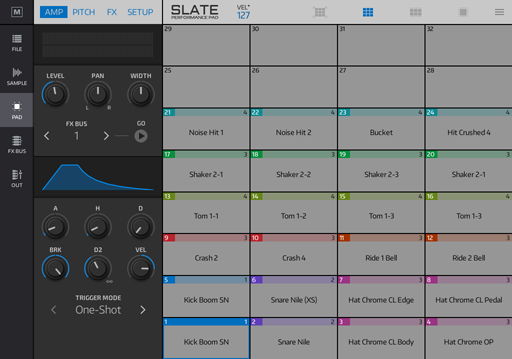
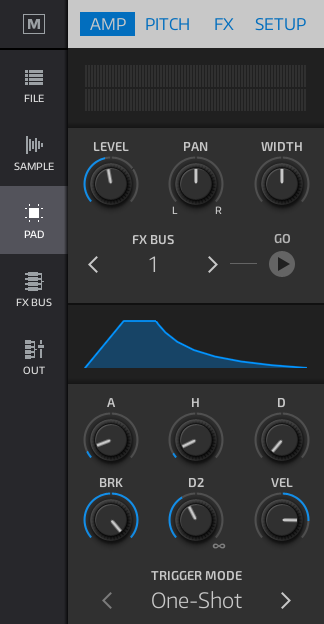
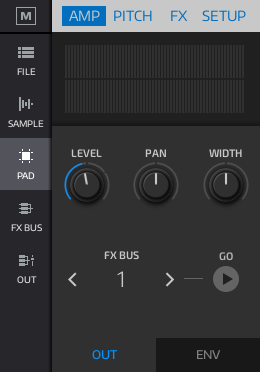
The PAD > AMP subpage is for editing the selected pad's volume, pan, width, output bus and trigger modes.
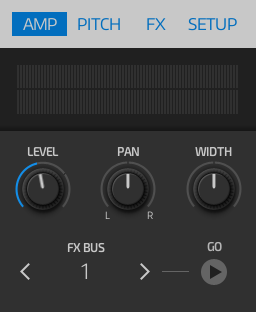 |
OUTPUT METER - Indicates the pad's signal output level. LEVEL - Sets the pad's output volume. PAN - Sets the pad's stereo positioning. WIDTH - Sets the pad's stereo width. FX BUS - Determines the bus the pad sends its output to. GO - Navigates to the FX BUS page for the pad's current output bus. |
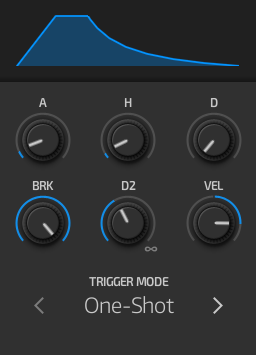 |
AMP ENVELOPE: A - Attack time. H - Hold time (after attack). D - Decay time to the breakpoint (after hold). BRK - Breakpoint level. D2 - Time taken to decay to silence (after breakpoint). VEL - Scales the envelope's amplitude according to the note velocity. TRIGGER MODE: One-Shot - Envelope continues to run when pad is released. Sustain - Envelope sustains when pad is held, until samples finish. Sustain+Loop - Envelope sustains when pad is held, samples are looped. |
The PAD > PITCH subpage is for changing the selected pad's pitch settings.
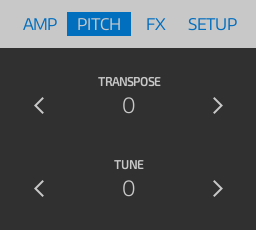 |
TRANSPOSE - Sets the pad's pitch in semitone steps. TUNE - Sets the pad's pitch in cents. |
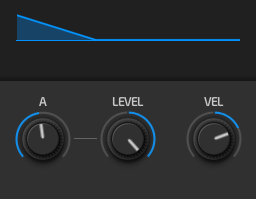 |
PITCH ENVELOPE: A - Attack time. LEVEL - Envelope's start level. VEL - Scales the envelope's amplitude according to the note velocity. |
The PAD > FX subpage is for adjusting the selected pad's filter and waveshaper settings.
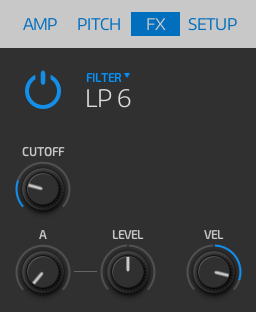 |
TAP on the filter name to set its type. POWER BUTTON - Enables the filter. CUTOFF - Filter's cutoff level. Q - Filter's resonance (only available for some filter types). PITCH ENVELOPE: A - Attack time. LEVEL - Envelope's start level. VEL - Scales the envelope's amplitude according to the note velocity. |
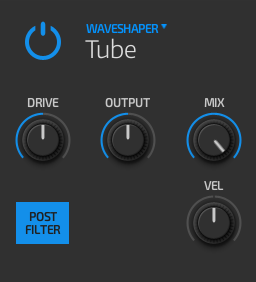 |
TAP on the waveshaper name to set its type. DRIVE - Waveshaper's input gain. OUTPUT - Waveshaper's output gain. MIX - Dry/wet mix. POST FILTER - Determines if the waveshaper is applied before or after the pad's filter. VEL - Scales the waveshaper's drive level according to the note's velocity. |
The PAD > SETUP subpage is for setting up the selected pad's MIDI note, voice grouping and custom appearance.
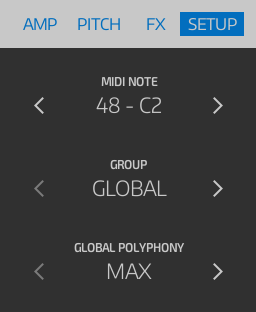 |
MIDI NOTE - The MIDI note number that the pad will respond to. GROUP - The voice group that the pad belongs to. You can assign multiple pads to the same voice group and then set the maximum polyphony for that group. This is useful for choking open/closed hi-hats or controlling the number of voices which are assigned to long samples such as cymbals. GROUP POLYPHONY - The maximum number of voices which are allowed to play within the pad's current voice group. |
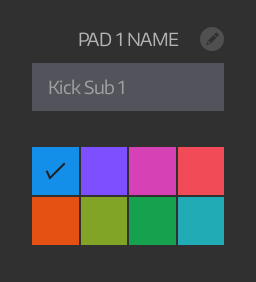 |
PAD NAME - Sets a custom name for the pad. COLOUR - Determines the colour used to represent the pad. |
Each FX BUS subpage represents one of Slate's 4 internal FX buses.
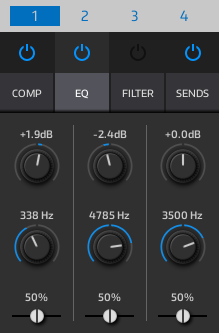 |
The FX chain shows the bus insert effects. The effect on the left is the first in the chain: TAP AND HOLD and DRAG HORIZONTALLY to drag an effect to a different position in the chain. TAP an effect's POWER BUTTON to enable or disable the effect. The effects section contains a Compressor, an EQ, a general purpose filter and level controls for the reverb and delay send effects. These are simplified versions of the effects detailed in the Effects Section. |
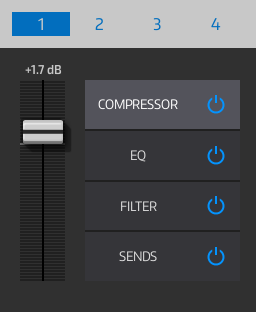 |
LEVEL SLIDER - Sets the output level of the bus and indicates its output level. The FX chain shows the bus insert effects. The effect at the top is the first in the chain: TAP AND HOLD and DRAG VERTICALLY to drag an effect to a different position in the chain. TAP an effect's POWER BUTTON to enable or disable the effect. |
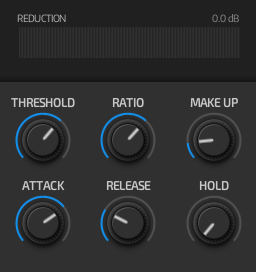 |
The lower panel shows the controls for the current selected effect. The effects section contains a Compressor, an EQ, a general purpose filter and level controls for the reverb and delay send effects. These are simplified versions of the effects detailed in the Effects Section. |
The OUT > INSERTS subpage is for setting up the main output bus insert effects and adjusting reverb/delay return levels.
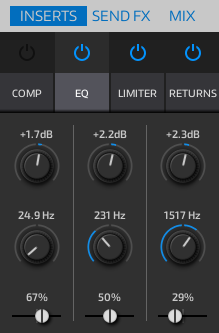 |
The FX chain shows the output bus insert effects. The effect on the left is the first in the chain: TAP AND HOLD and DRAG HORIZONTALLY to drag an effect to a different position in the chain. TAP an effect's POWER BUTTON to enable or disable the effect. The effects section contains a Compressor, an EQ, a Limiter and return level controls for the reverb and delay effects. These are simplified versions of the effects detailed in the Effects Section. |
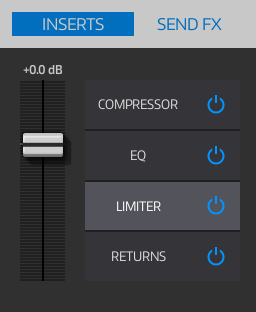 |
LEVEL SLIDER - Sets the output level of the bus and indicates its output level. The FX chain shows the output bus insert effects. The effect at the top is the first in the chain: TAP AND HOLD and DRAG VERTICALLY to drag an effect to a different position in the chain. TAP an effect's POWER BUTTON to enable or disable the effect. |
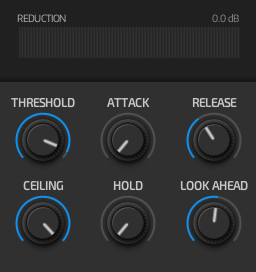 |
The lower panel shows the controls for the current selected effect. The effects section contains a Compressor, an EQ, a Limiter and return level controls for the reverb and delay effects. These are simplified versions of the effects detailed in the Effects Section. |
The OUT > SEND FX subpage is used to set up Slate's global reverb and delay send effect parameters. You can send audio to these effects by assigning a pad to an FX BUS and then using the FX bus' SEND insert to set the level. The effects' return levels are set using OUTPUT BUS' RETURN insert.
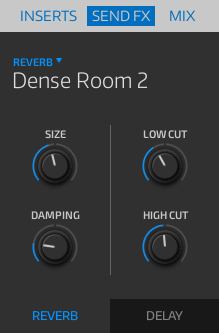 |
The reverb effect is a simplified version of Algoverb and the delay effect is a simplified version of the Delay. |
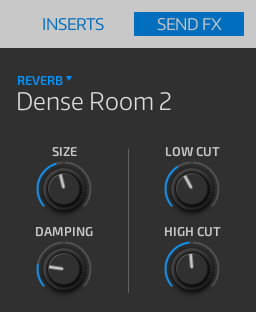 |
The reverb effect is a simplified version of Algoverb, detailed in the Effects Section. |
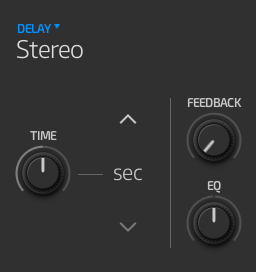 |
The delay effect is a simplified version of the Delay, detailed in the Effects Section. |
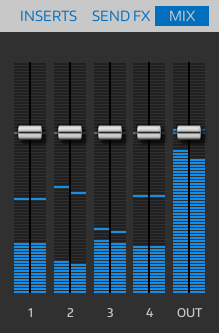
The OUT > MIX subpage is used to balance the individual levels of the internal FX buses and set the overall level of the main output.
 |