Effects
Tap on an effect below to find out more about it.
EQ-3B
3 band equalizer with spectrum analyzer
ALGOVERB
Algorithmic reverb
COMPRESSOR
Compressor/expander with optional external sidechain
LIMITER
Lookahead limiter
DELAY
Multi-mode stereo delay with optional beat sync
MULTI-FX
Chorus, ensemble, flanger or phaser effect
WAVESHAPER
Waveshaper with optional oversampling
LO-FI
Bitcrusher and sample rate decimator
EXCITER
Synthesizes extra high frequency content
STEREO FILTER
Single band multi-mode filter with spectrum analyzer
STEREO GAIN
Stereo gain and image processor
EXTERNAL EFFECT
Hosts 3rd party AUv3 audio and MIDI effects
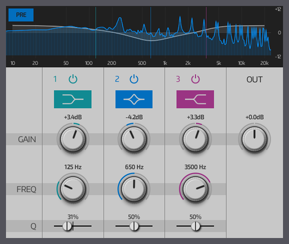
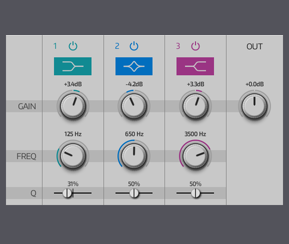
EQ-3B
An equalizer with 3 independent frequency bands. Each band may use a different filter shape and can be individually enabled or disabled. If you need more bands you can always add more EQs in series.
Unlike most other effects, the EQ-3B does not support automation. If you wish to automate a frequency band you may instead use the Stereo Filter.
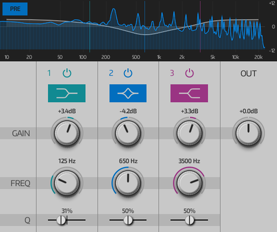 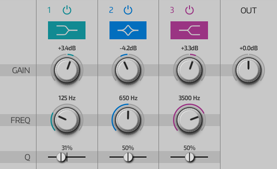 |
Use the spectrum analyzer to help visualize the frequency content of the signal. The PRE / POST button toggles its view between the EQ's input or output. The OUT control sets the master gain when the effect is enabled. Use this to minimize volume differences when the effect is enabled or disabled. |
Each band is functionally identical and provides the following controls:
| ENABLE | Enables/disables the band. The band is automatically enabled whenever you adjust one of its controls. | |
| SHAPE | Selects the filter shape the band should use. | |
| GAIN | The band's gain. The exact behaviour depends on the filter shape. Some filter shapes do not have a gain control. | |
| FREQ | The band's centre frequency. | |
| Q | The band's resonance. Low values create a smoother response over a wider range of frequencies. High values create a sharper response over a narrower range of frequencies. |
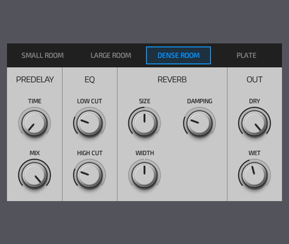
Algoverb
A reverberation effect with a choice of 4 different algorithms.
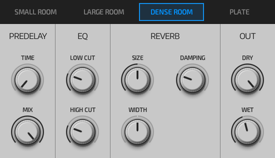 |
Reverb algorithms: SMALL ROOM - From close ambience up to a small room. LARGE ROOM - General purpose room. DENSE ROOM - Room with a thick decay tail. PLATE - Bright with a long smooth decay tail. |
| PREDELAY TIME | Adds an initial delay to the input signal before it is sent to the reverberator. Useful for creating space between the dry signal and its reverb response. |
|
| PREDELAY MIX | Controls the mix between the undelayed and predelayed signals sent to the reverberator. Useful for making the predelay more subtle. |
|
| EQ LOW CUT | Reduces the amount of low frequency content sent to the reverberator, so it sounds less boomy. | |
| EQ HIGH CUT | Reduces the amount of high frequency content sent to the reverberator, so it sounds less airy. | |
| REVERB SIZE | The length of the reverb tail. | |
| REVERB DAMPING | How quickly higher frequencies will decay as the reverb tail evolves. | |
| REVERB WIDTH | Controls the stereo width of the reverberated signal. | |
| OUT DRY | The amount of the dry input signal which is mixed to the effect's output. | |
| OUT WET | The amount of the wet (reverb) signal which is mixed to the effect's output. |
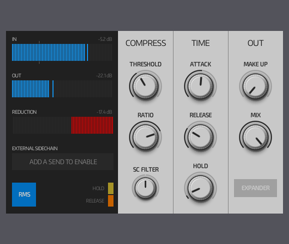
Compressor
A compressor/expander with an optional external sidechain input.
In basic terms, a compressor/expander is an automatic gain control. When operating as a compressor it reduces the level of the signal when it's above the threshold and thus reduces (ie. compresses) the signal's dynamic range. When operating as an expander it reduces the level of the signal when it's below the threshold and thus increases (ie. expands) the signal's dynamic range.
To keep things simple we'll assume the effect is being used in its normal compressor mode. If you're using the expander mode, remember that the threshold works differently as described above.
In order to achieve its task, a compressor must assess the volume level of the incoming signal. The part of the effect which is responsible for this is known as the sidechain. The input to the sidechain is usually the same as the input signal to the effect, known as internal sidechaining.
Sometimes, external sidechaining is useful, where the sidechain's input comes from a different source. A good example of this would be ducking the volume of the bassline when the kick drum plays. In this case, the bassline track would have a compressor whose sidechain input comes from the kick drum track. You can achieve this by using the mixer to add a Track Send from the kick drum track to the compressor on the bassline track.
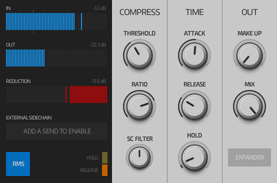 |
Use the REDUCTION meter and RELEASE / HOLD indicators to help visualize how the compressor is working. |
| THRESHOLD | The level where the compressor starts to act. If set low, the compressor will be working most of the time. If set high, the compressor will only react to the very loudest parts of the input signal. |
| RATIO | The amount of gain reduction the compressor will apply once the input signal exceeds the threshold. If set low, the compressor will only apply a mild reduction. If set to maximum, the compressor will heavily limit the gain. |
| ATTACK | How quickly the compressor reacts once the input signal exceeds the threshold. If set low, the compressor will react almost immediately. If set high, the compressor will take some time to react - useful if you wish to let the initial attack transient through (eg. for a snare drum). |
| RELEASE | How quickly the compressor will restore the gain to its normal level once the input signal falls below the threshold and the hold time has elapsed. If set low, the compressor will restore full gain almost immediately. If set high, the compressor will take some time to restore the gain - you can use this on reverb drum loops to create a pumping or rushing sound after each beat. |
| HOLD | Adds an extra time delay before the compressor goes into its release state. |
| MAKE UP | Since the compressor always works by reducing the level of the incoming signal, this may be used to compensate or 'make up' this volume reduction so that the peak output is approximately the same as the original signal. |
| MIX | Sets the dry/wet mix between conventional series compression (100% wet) and parallel compression (50/50 mix). Use parallel compression to preserve more of the original input signal's dynamics. |
| EXPANDER | Enables expander mode. |
| RMS | When enabled, the sidechain uses the RMS signal level. When disabled, it uses the peak level. RMS is generally preferred as it prevents the compressor from reacting to very short transients. |
| SC FILTER | Applies a high or low pass filter to the sidechain input (internal or external). This is useful for filtering out frequencies you don't want the compressor to react to, such as hi-hats or kick drums. |
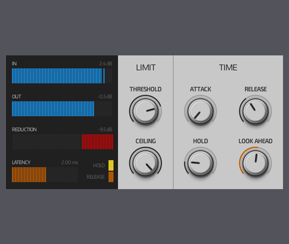
Limiter
A brickwall limiter with lookahead. A limiter ensures that its output signal never exceeds a given level, known as the ceiling level. In some ways it is similar to a compressor with an infinite ratio and zero attack time. However, zero attack times are undesirable in practice since sudden gain changes can result in ugly click noises. The limiter solves this problem with lookahead - it delays the signal slightly so it has enough time to see what's coming and can reduce the gain smoothly before the transient occurs.
The disadvantage with lookahead is that the limiter's output signal is also delayed and will add extra latency. NanoStudio automatically compensates all other tracks and sends by adding delays to them so that everything stays in sync, but it can't remove the additional latency. Therefore, if you use NanoStudio for real-time performance then a lookahead time of less than 1-2ms is recommended. Longer lookahead times are best reserved for non-realtime playback and final mastering/mixdowns.
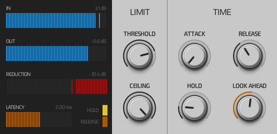 |
Use the REDUCTION meter and RELEASE / HOLD indicators to help visualize how the limiter is working. |
| THRESHOLD | The level where the limiter starts to act. If set low, the limiter will be working most of time. If set high, the limiter will only react to the very loudest parts of the input signal. |
| CEILING | Sets the maximum signal level the limiter can output. |
| ATTACK | How quickly the limiter reacts to signals above the threshold. If set to minimum, the limiter will react quickly enough to reduce the gain before the transient occurs. If set to higher values, the limiter will take more time to react and will resort to clipping any transients which it couldn't remove via gain reduction. |
| RELEASE | How quickly the limiter will restore the gain to its normal level once the input signal falls below the threshold and the hold time has elapsed. |
| HOLD | Adds an extra time delay before the limiter goes into its release state. |
| LOOK AHEAD | How much the limiter will delay its output signal by so it has enough time reduce its gain prior to the next transient. If you use NanoStudio for real-time performance then a lookahead time of less than 1-2ms is recommended. |
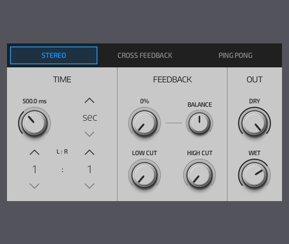
Delay
A traditional single-tap stereo delay with feedback. The delay time may be set either in seconds or as beat intervals (synchronized to the song's tempo).
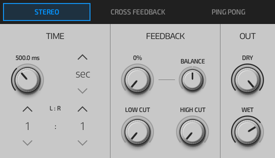 |
The delay mode determines the feedback routing between L/R channels: STEREO - The left and right channels are delayed individually. CROSS FEEDBACK - The delayed signal from each channel is fed into the opposite channel. PING PONG - Similar to CROSS FEEDBACK, but the input L/R channels are also swapped before they are fed to the delay. |
| TIME | The length of the delay. By default, the delay time is set in seconds. To set the delay time using beat intervals, TAP THE UP BUTTON above the 'sec' units text. |
| L : R | Sets the delay time ratio between the left and right channels. A ratio of 1:1 means that both channels are delayed by the same amount. |
| FB AMOUNT | The amount of the delayed output which is fed back to the delay's input. At the minimum setting, the delay will only produce a single repeat. Higher settings result in multiple repeats. |
| FB BALANCE | Sets the pan of the wet (delayed) signal. This is useful for creating complex stereo patterns when layering multiple delays. |
| FB LOW CUT | The amount of low frequency content which is attenuated before it is fed back to the delay. |
| FB HIGH CUT | The amount of high frequency content which is attenuated before it is fed back to the delay. |
| OUT DRY | The amount of the dry input signal which is mixed to the effect's output. |
| OUT WET | The amount of the wet (delay) signal which is mixed to the effect's output. |
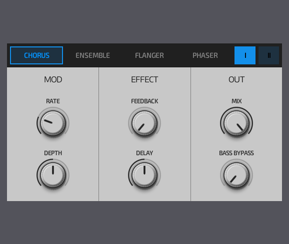
Multi-FX
An effect capable of producing time modulated delay/filtering effects such as chorus, ensemble, flanging or phasing.
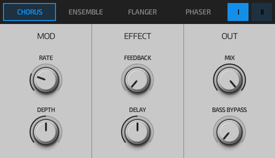 |
CHORUS - Mixes delayed copies of the input signal together to create a thicker sound. The delays are modulated slowly to add variation. ENSEMBLE - Uses multiple chorus units to create a thicker sound. FLANGER - Similar to CHORUS, but uses longer delay times and more feedback for a more metallic sound. PHASER - Mixes filtered copies of the input signal together. These copies introduce phase-shifts to the signal to create a distinctive phasing sound. Each filter is modulated slowly to add variation. |
| MOD RATE | The speed at which the effect is modulated. |
| MOD DEPTH | The amount of modulation applied to the effect. |
| FEEDBACK | The amount of the effect's output signal which is fed back to its input. |
| DELAY | Adds an additional fixed offset to the delay time generated by the effect's modulation. |
| MIX | The balance between the dry input signal and the wet output signal. |
| BASS BYPASS | Reduces the effect's processing of low frequencies. Useful for preserving the stereo image of bass sounds. |
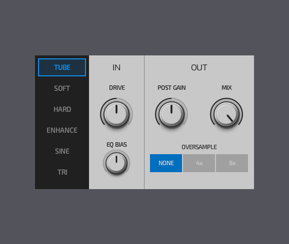
Waveshaper
A waveshaper with optional oversampling. This effect is capable of producing mild saturation, hard distortion or FM-like wave folding.
Waveshaping adds extra harmonics to the input signal. If you're using it on a signal which has a lot of high frequency content, these harmonics can exceed the sample rate and cause aliasing. To reduce the amount of aliasing you can enable oversampling. However, oversampling comes at the cost of increased CPU load so you should generally only use it when needed.
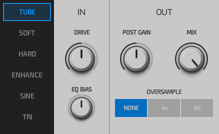 |
TUBE - Warm saturation. SOFT - Overdrive. HARD - Clipped distortion. ENHANCE - Adds subtle higher frequencies. SINE - FM-like wave folding using a sine wave shape. TRI - FM-like wave folding using a triangle wave shape. |
| DRIVE | The amount of gain applied to the input signal before it is sent to the waveshaper. |
| EQ BIAS | Applies an EQ tilt filter to the input signal before it is sent to the waveshaper. Use this to emphasize the effect on the high or low frequency content of the signal. |
| POST GAIN | The amount of gain applied to the signal after it has been through the waveshaper. Use this to minimize the difference in signal level between the waveshaper's input and output. |
| MIX | The balance between the dry input signal and the wet output signal. |
| OVERSAMPLE | Oversamples the signal to reduce aliasing. Higher oversample values will also result in higher CPU usage. |
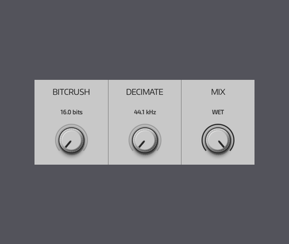
Lo-Fi
A bitcrusher and sample rate decimator which digitally degrades the signal.
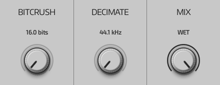 |
| BITCRUSH | Emulates bit-depth reduction by reducing the number of amplitude 'steps' available to the output signal. |
| DECIMATE | Emulates sample rate reduction by sampling the input signal at a lower rate than usual. |
| MIX | The balance between the dry input signal and the wet output signal. |
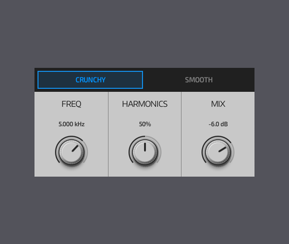
Exciter
Adds brightness to the sound by artificially synthesizing new high frequencies which are not present in the original input signal.
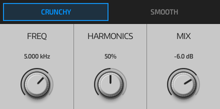 |
The CRUNCHY / SMOOTH setting subtly affects the character of the sound. Choose the setting which sounds the best for your source material. |
| FREQ | Sets the minimum synthesis frequency. |
| HARMONICS | The number of extra harmonics introduced to the signal by the synthesis process. |
| MIX | The balance between the dry input signal and the wet output signal. |
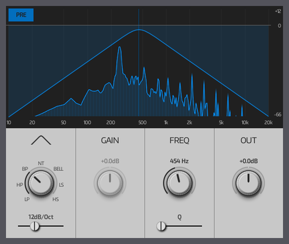
Stereo Filter
A precise stereo filter with a choice of filter shapes. It is similar to a single band of the EQ-3B effect, but also supports automation and provides more control over the filter's slope.
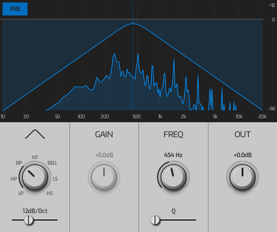 |
Use the spectrum analyzer to help visualize the frequency content of the signal. The PRE / POST button toggles its view between the EQ's input or output. |
| SHAPE | Selects the filter shape. |
| SLOPE | How quickly the filter attenuates frequencies outside its passband, in units of dB/Octave. |
| GAIN | The filter's gain. The exact behaviour depends on the filter shape. Some filter shapes do not have a gain control. |
| FREQ | The filter's centre frequency. |
| Q | The filter's resonance. Low values create a smoother response over a wider range of frequencies. High values create a sharper response over a narrower range of frequencies. |
| OUT | The master output gain when the effect is enabled. |
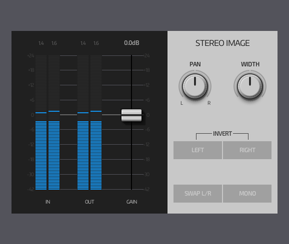
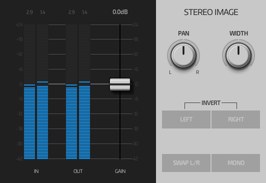
Stereo Gain
The Stereo Gain effect provides a number of functions for processing the gain and imaging of stereo signals.
It's also useful for gain-staging before or after non-linear effects such as compressors, limiters and waveshapers.
 |
Suggested uses: - Gain-staging before or after non-linear effects such as compressors, limiters and waveshapers. - Fixing phase issues with material recorded via stereo microphones. - Getting a track to sit in the stereo mix more satisfactorily. |
| GAIN | The master output gain. |
| PAN | The master output pan. |
| WIDTH | The difference between the left and right output channels. 0% is mono, 100% is no change and 200% adds additional width. Has no effect on mono signals. |
| INVERT L/R | Inverts the phase of one or both channels. |
| SWAP L/R | Swaps the left and right channels with each other. |
| MONO | Converts the signal to mono. |
External Effect
The External Effect is used to host 3rd party AUv3 audio or MIDI effects.
 |
Use this button to toggle between normal size and full screen views. |