
Overview
Creating
Loading
Saving
Templates
Image and Notes
Archiving
Mixdown
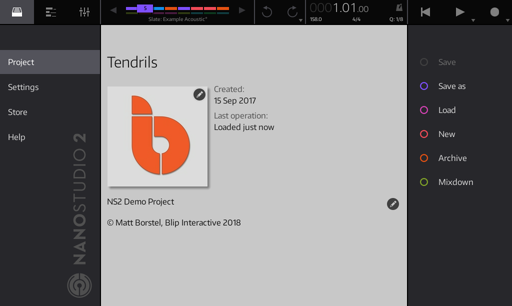
Use the project page to create, load, save, archive and mixdown your projects. You can also use it to add an image and text notes to the current project.
Access the project page by tapping the HOME button on the Status Bar.
| |
Quick links: Overview Creating Loading Saving Templates Image and Notes Archiving Mixdown |
A single NanoStudio project comprises:
Within a project, NanoStudio automatically maintains 3 special versions:
| Autosave | Automatically saved by the app whenever it is closed, sent to the background or before it performs a lengthy operation such as a mixdown. |
| User save | The last version you saved by explicitly using the Save operation. |
| Previous save | The previous user save. This is useful if you accidentally save changes you didn't wish to keep. |
When NanoStudio is started, it always loads the autosaved version of the last project you were working on so that the app is returned to the same state you left it in. Sometimes this is undesirable (eg. if you were making some experimental changes you didn't wish to keep). In this case, you use the Load operation to load one of the other versions instead.
You can also archive a project, which is useful for backing up or distributing your project to another device or NanoStudio user without worrying about missing samples.
To a create a new project, open the Project Page and select New from the column on the right. If you've made modifications to the current project, you will first be asked if you wish to keep them.
You can now type a name for your new project. Otherwise, stick with the default name - you can always rename it later if your project becomes good enough to deserve a real name!
By default, your new project will be be created in the 'My Projects' folder. If you want to start a different folder, tap the Folder button and choose or create a new subfolder inside 'My Projects'. Again, you don't have to worry about this too much for now as you can always move the project at a later date using the File Browser.
Finally, you can optionally tap on the Template button to choose a template you wish your project to be based on. You can find out more about this in Project Templates.
Once you've made your choices, tap the CREATE button on the keyboard and you're ready to go!
To a load an existing project, open the Project Page and select Load from the column on the right. If you've made modifications to the current project, you will first be asked if you wish to keep them.
Use the File Browser to choose a project. The browser automatically organizes projects into these categories:
| Recent | Projects you've recently created or loaded. You can pin certain projects if you wish so that they're not removed from this list. |
| My Projects | The default folder for projects you've created or imported. If you wish, you can create further subfolders inside this folder. |
| Templates | Projects saved here can be used as templates, which may be used as the starting point for new projects. |
| Demos | Demo projects which come with the app or IAP packs. |
| Archived | Projects you've archived. If you wish, you can create further subfolders inside this folder. |
| Trash | Projects you've recently deleted. The oldest items in this folder may be deleted if your device needs more storage space. DOUBLE TAP on a project to restore it to its original location. |
Note: When you open an archived project from the Demos or Archived folder, the archive will first be decompressed to My Projects before loading. If there is a project with the same name already in the My Projects folder, NanoStudio will automatically append a unique number to the end of the project's name so the existing project is not overwritten.
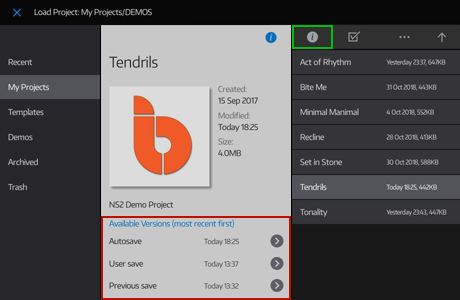 |
As discussed in the Overview, NanoStudio maintains up to 3 versions of each project. To see if there are any other versions available, use the File Browser's info button (highlighted in GREEN to show the info pane (highlighed in RED). Tap on one of the arrow buttons to load a different version. |
To save the current project, open the Project Page and select Save from the column on the right. If you haven't made any modifications to the current project, this option will not be available.
To save the current project under a different name, use Save as. You can choose a new name or let the app auto-number the new version for you. This last option is a good way of keeping historical snapshots which you may want to return to in future. If you later decide you no longer want some of the older versions, use the File Browser's multiple selection and delete features to easily clean them up.
Projects saved to the Templates folder become available for use as templates when creating new projects. Templates can be considered as 'starting points' for common applications and setups. You can save as many templates as you wish.
NanoStudio automatically installs some templates which contain a few instruments so that you can get started quickly. You're free to overwrite these with your own versions containing your preferred track set up, artist image, copyright text notes or anything else you like.
Save a project named Default to the Templates folder to make it the default template when creating new projects.
You can add a custom image or text notes to the current project. To do this, open the Project Page and tap on the circular edit buttons on the top right of the project's image and/or text.
As mentioned in the Overview, NanoStudio projects usually don't contain the samples they use. Instead, they just maintain the path to where the samples are to be found on your device (such as the Factory, IAP and User folders). This avoids having multiple copies of the same samples on your device and helps to reduce the size of the project. However, if you wish to distribute your project to another device or NanoStudio user, or you want to protect your project against accidental changes made by editing a shared sample, you can archive your project.
When a project is archived, all the samples the project needs are copied into the project's Audio folder so that the project is fully self-contained. Samples in the Factory or IAP folders are not copied, as these are expected to be present on the device used to load the archive. The archived project is compressed into a single file so that it uses the minimum storage space and can be distributed as efficiently as possible.
To archive the current project, open the Project Page and select Archive from the column on the right. Choose a different name or folder for the archive if you wish, and then tap the ARCHIVE button on the keyboard.
Once NanoStudio has saved the archive, you can tap on the EXPORT button to share it via various methods such as Airdrop, Dropbox, Mail, the iTunes file app and others.
If you don't want to export the archive right now, you can always do it at a later date by using the export operation in the File Browser.
Archived projects are loaded in just the same way as usual NanoStudio projects. See Loading a Project for more details.
You can use the mixdown function to create a final audio mix of your project at any time. However, you're not just limited to a simple stereo mixdown. You can also mixdown individual tracks or regions of the song, making the mixdown function ideal for exporting stems and resampling the output for further re-synthesis.
To mixdown the current project, open the Project Page and select Mixdown from the column on the right.
The column on the left of the mixdown page enables you to create a new mixdown or browse the previous mixdowns you've made.
| Type | Final Mix - Mixes the master output to a single stereo output file. All Tracks - Creates a file for each individual track. Top Level Tracks - Creates a file for each of the top level tracks. Each file will also contain the output from the top level tracks' child tracks. Soloed Tracks - Creates a file for only the tracks which are currently soloed. |
|
| Region | Entire Song - Mixes the entire song. Song Loop - Mixes just the current song loop region. |
|
| Format | Determines the audio output file format. | |
| Sample Rate | Determines the audio output file sample rate. | |
| Normalize Files | No - Samples are not normalized. Globally - Normalizes all output files based upon the loudest file, so that they all retain the same relative volume. Individually - Normalizes all output files individually, so each file is as loud as possible. |
|
| Wait for AUs to Load | Some Audio Units need extra time to load before they are ready for mixdown. If an AU appears silent in the output file, try adding a wait time to give it a chance to get ready. | |
| Render Tail | When enabled, the mixdown will continue to run until the tail of the song has fully decayed to silence. | |
| Trim Start Silence | Removes any silent sections from the start of each output file. | |
| Trim End Silence | Removes any silent sections from the end of each output file. | |
| Zip Output Files | Zips the output file (or files) into a single file. This is useful when you're mixing down individual tracks and wish to distribute them as a single file. | |
| START | TAP to start the mixdown. |
The previous mixdowns page shows the previous mixdowns you've made. You can use the File Browser to copy, move, rename, delete, import or export your mixdowns.
TAP on a file's play button to audition it.
DOUBLE TAP on a file to open it in the Sample Editor.
If you're using the mixdown for resampling, it's a good idea to use the Sample Editor's 'Save As' function to save the mixdown to more suitable location, such as your Library folder (if it's something you'll use generally) or your Project folder (if it's specific to your project).