

Overview
Track vs Part Automation
Parameter List
Editing Window
Command Buttons
The automation editor is used by both the Song Editor and Part Editor for editing automation data.
| |
Quick links: Overview Track vs Part Automation Parameter List Editing Window Command Buttons |
Automation is essentially a sequence of values which is used to automatically vary the controls of an instrument, effect, mixer track or send during playback.
An automation sequence is defined using one or more automation points. Depending upon how the points are placed, they can be used to create steps, ramps or curves.
Automation points may be recorded in real-time by dragging knobs and sliders on the UI, or by using external MIDI controllers which have been mapped to UI controls. See the Record Settings for information about the options available when recording real-time automation.
The automation editor can also be used to directly draw automation points in non-realtime.
Automation can be contained within tracks or parts. The only difference between track and part automation is the type of destination they can control:
Aside from this difference, automation works in exactly the same manner in both cases and may be created or edited using the automation editor.
Track automation is accessed from the Track Automation page of the Song Editor.
Part automation is accessed from the Part Automation page of the Part Editor.
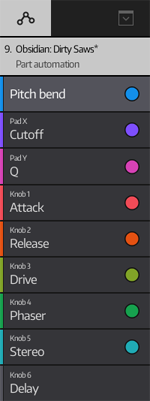 |
The parameter list is located on the left side of the automation editor. Each entry in the list represents a parameter which may be controlled via automation. Parameters which have one or more automation points are represented with a coloured bar and an enable/disable button. If a parameter does not have any automation points then its enable/disable button is hidden and the bar will be grey. TAP on a parameter in the list to create or edit its automation points. |
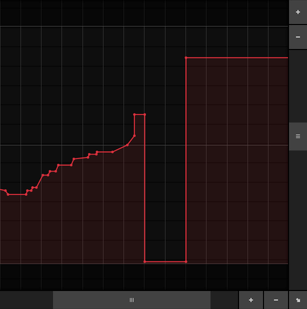
Use the editing window to navigate the view and make selections.
Navigation and selection can be performed with the traditional DRAG and PINCH ZOOM actions, but you will often find that the SELECT and ZOOM command buttons are a more efficient way to achieve these operations in a more task-oriented manner.
Note that the VERTICAL SCROLLBAR does not change the view of the automation points. Instead, it allows you to scroll the background so that you can see the content of the track or part the automation belongs to.
 |
NAVIGATION AND SELECTION SCROLLING - Use two fingers to PINCH ZOOM, and then release one finger and drag. Alternatively, use the horizontal scrollbar. ZOOMING - Use two fingers to PINCH ZOOM. You can perform a context-sensitive zoom by double tapping the ZOOM command button. Alternatively, you can use the +/- buttons on the scrollbars. TAP on a point or DRAG to make a selection. You can change the selection mode via the SELECT command button. TAP on the background to deselect all. DOUBLE TAP on the background to select all. |
To move an automation point or a selection of points, TAP AND HOLD on one of the points. After a short pause you will be able to freely move the selection by dragging horizontally or vertically.
Most of the time you will just want to move points horizontally or vertically. The best way to achieve this is with the white drag handles which appear around the edges of the view when a selection is made:
 |
Moves the selection forwards or backwards in time. |
 |
Scales the amplitude of the selected points (ie. by multiplying their values). |
 |
Offsets the amplitude of the selected points (ie. by adding to or subtracting from their values). |
Use the command buttons to set beat grid properties, perform task-oriented zoom/selection and edit the selected automation points.

| GRID | TAP to view or change the grid and snap options. DOUBLE TAP to toggle the grid snap on or off. |
| ZOOM | TAP to zoom on a specific area. DOUBLE TAP to perform a context-sensitive zoom. DOUBLE TAP AGAIN to revert to the previous zoom. |
| SELECT | TAP to select a specific area. DOUBLE TAP to toggle the selection mode. |
| DRAW | TAP to enable draw mode. When draw mode is enabled you can tap or drag in the editing window to create or delete automation points. |
| DELETE | Deletes the current selection. |
| DUPLICATE | Duplicates the current selection. TAP AND HOLD for more options, such as making multiple duplicates. |
| ACTIONS | Performs general editing actions on the current selection such as quantizing, removing excess points, copying and pasting. |
| BACK TO SONG | Only available when editing part automation. Closes the Part Editor and returns back to the Song Editor . |